I spent most of today trying to figure out how to generate an Android build of YAGS. The RenPy documentation is pretty good, except if you want to have your own keystore for signing.
Start by opening RenPy and clicking the “Android” link for your game. If this is your first android build, it’ll download and install a bunch of tools and prompt you to install the Java JDK, if you haven’t already.
After all of that’s done, you can test your game by launching it (from that same "Android" link > Emulation > Phone (or Tablet)). You may need to make some tweaks, especially if you’ve done extensive GUI customization for the standard desktop form factor. In particular, note that the variant "touch" and variant "small" directives can be useful to update your screens, and that gui.rpy has several mobile-specific style overrides (such as font sizes) at the bottom of the file.
Once you’re happy with your game, it’s time to build a package. Before you do this, you may want to create and configure your own keystore and create custom icons (with thanks to Rob Colton for help with the keystore).
First, if you don’t want to use the keystore that RenPy creates for you, you can create your own with keytool:
This will prompt you for various values involved in generation. You should set a keystore password, enter your name (i.e. “Bob Conway”), and your company (i.e. “bobcgames”) as the organization unit and organization. Then enter a key password. This will create a .keystore file in your user directory (i.e. C:\Users\Bob\.keystore).
(Alternately, you can use this tool, as recommended by Rob, do to keystore generation visually.)
Next, you’ll want to update your rapt settings. Navigate to renpy-7.x.x-sdk/rapt/project and open local.properties in a text editor. Edit these settings to match the values entered during keystore generation (alias, keystore and key passwords, and keystore location).
Finally, create images for the icons and presplash screen. The official documentation is pretty good about information on this, but note that the files should go in your base directory, not under /game. (This is the same directory where your icon.ico and icon.icns files go.)
You’ll also probably want your foreground image to be larger than the “minimum safe” size of 132×132 px. I just did 250×250 px for mine.
That should be enough to successfully build an apk, which you can then distribute!
Also worth noting: Multi-game persistence does not work with mobile builds. You should case all of your multi-persistence (including initializing the variable) with if not renpy.mobile: checks.
One of the things I’ve been more aware of recently is nudity in games, and particularly how that plays (or doesn’t play) with payment processors.
A lot of games, to stay on the safe side, have released their games in a “censored” mode and then released patches to re-enable nudity. I’m not sure how other people do it, but my goal was to make it as simple as possible for users (one file to replace) but also give myself a lot of control over changes.
As always, I don’t pretend that this is the right or best way to do things… only that it works for me.
First off, you have to identify what file(s) and game declarations have nudity or will be affected by censoring. In my case, I have both nude sprites and nudity in my CGs, located in /images/chnew and /images/cg, as well as LayeredImage declarations for my CGs.
We start by defining a new rpy file ndpatch.rpy to hold the aspects that require and control patching. Because of the way my sprites work, the only other thing I need in here is the CG definitions*. We also include some additional constants, for use later.
## Is nudity allowed at all
define nudityIsAllowed = True

##  is for uncensored, c is for censored
define nudityverending = ""

## Align the game with the patch version where necessary
## Update expectedndpatchversion in options.rpy
define ndpatchversion = 1

layeredimage person_cg:
    always:
        "cg/person_base.jpg"
    if persistent.bodyhair_person:
        "cg/person_hair.png"
    if not persistent.nudes:
        "cg/person_censor.png"
Next, we define a separate rpa file for everything related to nudity (the sprites, the CGs, and the ndpatch.rpy file itself). This should come first in the build.classify calls since each file will be placed into an archive based on the order the rules are declared, in options.rpy. We also add a corresponding constant that will not be built into ndpatch.rpa.
## Match the patch version in ndpatch.rpy
define expectedndpatchversion = 1

init python:
    build.archive("ndpatch", "all")

    # Nudity
    build.classify("game/ndpatch.rpyc", "ndpatch")
    build.classify("game/images/chnew/**", "ndpatch")
    build.classify("game/images/cg/**", "ndpatch")

    # ...other archive and classify calls...
Now, we make a copy of the entire game project. In that copy, we edit the rpy file to reflect censored nudity.
## Is nudity allowed at all
define nudityIsAllowed = False

##  is for uncensored, c is for censored
define nudityverending = "c"

## Align the game with the patch version where necessary
## Update expectedndpatchversion in options.rpy
define ndpatchversion = 1

layeredimage person_cg:
    always:
        "cg/person_base.jpg"
    if persistent.bodyhair_person:
        "cg/person_hair.png"
And then we also make sure, in the censored version of the project, we merge the censor in the CGs with the base layer (so even the raw game assets don’t have nudity that can be uncovered via unarchiving the rpa file later). Similarly, any sprite image files that have nudity in them must be edited in the censored version of the project to remove or obscure nudity.**
Technically, this is enough to get censoring working. You would simply build a distribution of the game via the censored version of the project, build a second distribution via the uncensored version, and provide the ndpatch.rpa file from the uncensored version for download. The images will be replaced in the game with uncensored versions when the ndpatch.rpa file is replaced, since they are part of the ndpatch.rpa file.
However, we can do a little better.
First, you can use the nudityverending constant to change how the version of your game displays, to make it obvious whether it’s got nudity or not. For example:
screen about():
     ...stuff...
     text "Version [config.version!t][nudityverending]"
     ...stuff...
Second, your game may later need to change in a way that makes an older ndpatch.rpa incompatible. For example, if you add a new sprite expression, someone with an older ndpatch.rpa file that tries to use it against a newer game build will see errors when running the game. Similarly, if you delete an asset, someone with a newer ndpatch.rpa file will see errors with an older game build.
This is where the ndpatchversion and expectedndpatchversion constants come in handy. You can ensure they are equal when the game starts up and show an error or warning if they don’t match. For example:
label start:
if ndpatchversion != expectedndpatchversion:
    "Your ndpatch.rpa file is the wrong version for this build of the game."
    "Please download the latest patch and game from URL."
    return
and
screen main_menu():
    fixed:
        if ndpatchversion > expectedndpatchversion:
            text "{size=50}{color=#000}Your ndpatch.rpa is newer than the build of this game (v[config.version]). Please download the latest version of the game before patching.{/color}{/size}" xsize 500 xanchor 0.0 yanchor 0.0 pos(550, 100)
        elif ndpatchversion < expectedndpatchversion:
            text "{size=50}{color=#000}Your ndpatch.rpa too old for use with this build of the game (v[config.version]). Please download the latest version of the patch and try again.{/color}{/size}" xsize 500 xanchor 0.0 yanchor 0.0 pos(550, 100)
which then lets you bump both constants whenever you make a breaking change (like adding or removing a sprite asset or cg).
Finally, you can use the nudityIsAllowed constant inside the game itself anywhere that you want to handle differently in a censored vs uncensored game. For example, I change the warning that shows at the beginning of the game to reflect explicit vs non-explicit nudity.
There’s probably a way to make this work with a single Renpy project that builds both a ZIP distribution and a separate ndpatch.rpa file. But it seemed easier to me to just duplicate the project. But because of this, you probably want to do this work when your game is otherwise done, or you’ll potentially have to make bug fixes in both copies of the game project.
* Yes, I could have left the CG declarations outside of ndpatch.rpy and simply censored the base image, but that would require me to have a cg/person_censor.png file in both versions of the game, and that felt inefficient for me.
** Identifying and editing relevant images is where most of the work is, really. If you just want to flat out replace images, you don’t even need an ndpatch.rpy file. Simply declaring an ndpatch.rpa archive in options.rpy, and including all image files that will need to be censored in that archive, would be enough.
As someone with no video editing experience, looking at the requirement of making a trailer for YAGS, I was rather daunted by the prospect of figuring something out.
Enter RenPy, and ATL! A WIP version of the trailer can be viewed here. (Edit: Here now.)
I was able to create the entire game trailer in RenPy. The best part is that, because most of the sprites aren’t done yet, but the trailer is just RenPy code, I can easily fill in the final sprites later and re-record the video, without having to do serious updates. (At least, if I was doing this with video editing software, I imagine it would be a larger pain to swap images out.)
The best way to share this is probably to literally just paste the entire code used to create the trailer below. There are some notes and things I want to point out, after this huge block of text.
define quickwipeclear = CropMove(0.2, "wipeleft")
define quickwipe = CropMove(0.5, "wipeleft")
define quickwiperight = CropMove(0.5, "wiperight")
define quickwipeup = CropMove(0.5, "wipeup")
image welcomecollege = Text("Welcome to your Freshman year of college...", size=70)
image makefriends = Text("Meet people...", size=60)
image makefriendstwo = Text("(...and make friends...)", size=40)
image navigatecollege = Text("...navigate college life...", size=60)
image comeout = Text("...and come out...", size=60)
image comeoutfriends = Text("(...with a bit of help.)", size=40)
image makedec = Text("Make life-changing decisions!", size=40)
image playgames = Text("Play board games!", size=40)
image findbf = Text("Maybe even find a boyfriend?", size=40)
image comingsoon = Text("{color=#ffffff}Coming soon{/color}", size=60)
image myurl = Text("{color=#ffffff}https://yags-game.tumblr.com{/color}", size=40)
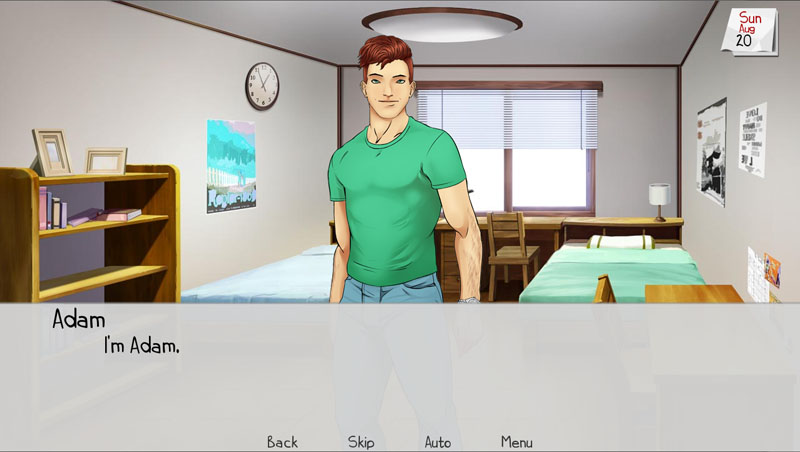
image adam grin = "images/adamgrin.png"
image nikhil crossed = "images/nikhilcrossed.png"
image adamchoice = "images/adamchoices.png"
image adamchoice choiceone = "images/adamchoices1.png"
image adamchoice choicetwo = "images/adamchoices2.png"
image adamchoice choicethree = "images/adamchoices3.png"
image gameschoice = "images/gamechoices.png"
image gameschoice choiceone = "images/gamechoices1.png"
image questionmark = Text("?", size=300)
transform questionm:
xalign 0.5
yalign 0.5
alpha 0.0
linear 1.0 alpha 1.0
parallel:
linear 4.0 alpha 0.2
pause 1.0
linear 0.5 alpha 0.0
parallel:
linear 5.5 zoom 5.0
transform campustransp:
alpha 0.0
pause 0.5
linear 0.5 alpha 0.2
transform logoshow:
zoom 20.0 xalign 0.5 yalign 0.5 alpha 0.0
parallel:
linear 0.5 alpha 1.0
parallel:
linear 0.5 zoom 0.8
parallel:
linear 0.5 rotate 2.0
linear 0.2 zoom 1.3
parallel:
linear 0.3 rotate 0.0
parallel:
linear 0.3 zoom 1.0
linear 0.2 zoom 1.1
linear 0.2 zoom 1.0
transform whitefadeout:
xalign 0.5
yalign 0.5
alpha 0.0
linear 0.5 alpha 0.8
linear 0.5 alpha 1.0
transform whitefadequick:
xalign 0.5
yalign 0.5
alpha 0.0
linear 0.5 alpha 1.0
transform subtextfadein:
xalign 0.5
yalign 0.3
alpha 0.0
pause 1.0
linear 0.3 alpha 1.0
transform textfadein:
xalign 0.5
yalign 0.2
alpha 0.0
linear 0.3 alpha 1.0
transform adamcursor1:
xalign 0.5
yanchor 0.0
ypos -50
linear 1.0 ypos 350
transform adamcursor2:
ypos 350
parallel:
linear 0.5 ypos 187
parallel:
linear 0.5 xoffset 50
transform adamcursor3:
ypos 187
parallel:
linear 0.25 ypos 270
parallel:
linear 0.25 xoffset -20
transform gamescursor1:
xalign 0.5
yanchor 0.0
ypos -50
parallel:
linear 0.7 ypos 226
parallel:
linear 0.7 xoffset 100
label start:
$ quick_menu = False
scene black
$ renpy.pause(2.0)
hide window
play music "theme.wav" noloop
show logo at logoshow
$ renpy.pause(1.5)
show campus behind logo with quickwipe
show logo with move:
yoffset -100
show welcomecollege with dissolve:
yanchor 1.0
xalign 0.5
ypos 550
$ renpy.pause(1.5)
show whitefill at whitefadeout
$ renpy.pause(0.5)
show white at whitefadequick
$ renpy.pause(1.7)
scene white
show makefriends at textfadein
show makefriendstwo at subtextfadein
show adam with moveinleft:
yalign 1.0
xanchor 0.5
xpos 0.2
$ renpy.pause(1.0)
show juan with moveinright:
yalign 1.0
xanchor 0.5
xpos 0.8
$ renpy.pause(1.0)
show frat behind adam with quickwiperight
$ renpy.pause(1.0)
show otherfrat behind adam with quickwipeup
$ renpy.pause(1.3)
scene white with quickwipeclear
show navigatecollege at textfadein
show james with moveinleft:
yalign 1.0
xanchor 0.5
xpos 0.2
$ renpy.pause(1.0)
show dan with moveinright:
yalign 1.0
xanchor 0.5
xpos 0.8
$ renpy.pause(1.0)
show halls behind james with quickwiperight
$ renpy.pause(1.0)
show otherqa behind james with quickwipeup
$ renpy.pause(1.3)
scene white with quickwipeclear
show comeout at textfadein
show comeoutfriends at subtextfadein
show jake with moveinleft:
yalign 1.0
xanchor 0.5
xpos 0.2
$ renpy.pause(1.0)
show nikhil with moveinright:
yalign 1.0
xanchor 0.5
xpos 0.8
$ renpy.pause(1.0)
show gamer behind jake with quickwiperight
$ renpy.pause(1.0)
show othergames behind jake with quickwipeup
$ renpy.pause(1.5)
scene theyard
show adam
show white:
xalign 0.5
yalign 0.5
alpha 0.3
show makedec:
xalign 0.5
yalign 0.3
with quickwipeup
$ renpy.pause(1.0)
hide white
hide makedec
with dissolve
"You wonder if it's just his friendly demeanor, but somehow, the prompt makes you actually consider telling him. After all, you {i}do{/i} have to live with this guy for the next 9 months.{w=3.25}{nw}"
window hide
show cursor at adamcursor1
show adamchoice behind cursor:
xalign 0.5
yalign 0.5
$ renpy.pause(0.45)
show adamchoice choiceone:
xalign 0.5
yalign 0.5
$ renpy.pause(0.2)
show adamchoice choicetwo:
xalign 0.5
yalign 0.5
$ renpy.pause(0.2)
show adamchoice choicethree:
xalign 0.5
yalign 0.5
$ renpy.pause(0.7)
show cursor at adamcursor2
$ renpy.pause(0.2)
show adamchoice choicetwo
$ renpy.pause(0.2)
show adamchoice choiceone
$ renpy.pause(0.7)
show cursor at adamcursor3
$ renpy.pause(0.2)
show adamchoice choicetwo
$ renpy.pause(0.7)
hide adamchoice
hide cursor
show adam grin
"You hit yourself internally, vowing to take the next good opportunity to come out to him.{w=1.75}{nw}"
scene atrium
show jake:
yalign 1.0
xanchor 0.5
xpos 0.2
show nikhil crossed:
yalign 1.0
xanchor 0.5
xpos 0.8
show white:
xalign 0.5
yalign 0.5
alpha 0.3
show playgames:
xalign 0.5
yalign 0.3
with quickwipe
$ renpy.pause(1.0)
hide white
hide playgames
with dissolve
nick "Ooo. Make a new city!{w=0.75}{nw}"
jake "No way. Finish that city. Guaranteed points. And a meeple back.{w=1.0}{nw}"
window hide
show cursor at gamescursor1
show gameschoice behind cursor
$ renpy.pause(0.6)
show gameschoice choiceone
$ renpy.pause(1.0)
hide cursor
hide gameschoice
show nikhil
nick "Going with the safe play? Both of you play it safe too often.{w=1.5}{nw}"
scene qaroom
show dan:
yalign 1.0
xalign 0.5
show white:
xalign 0.5
yalign 0.5
alpha 0.3
show findbf:
xalign 0.5
yalign 0.3
with quickwipe
$ renpy.pause(1.0)
hide white
hide findbf
with dissolve
"Dan is there by himself, sitting on a couch when you arrive.{w=1.25}{nw}"
dan "Christopher!{w=1.0}{nw}"
hide window
show questionmark at questionm
$ renpy.pause(0.5)
hide dan
show james behind questionmark
$ renpy.pause(1.0)
hide james
show jake behind questionmark
$ renpy.pause(1.0)
hide jake
show nikhil behind questionmark
$ renpy.pause(1.0)
hide nikhil
show juan behind questionmark
$ renpy.pause(1.0)
hide juan
show adam behind questionmark
$ renpy.pause(1.2)
scene black with quickwipeup
show logo with dissolve:
zoom 0.8
xalign 0.5
yalign 0.2
$ renpy.pause(1.8)
show comingsoon with dissolve:
xalign 0.5
yalign 0.6
$ renpy.pause(1.0)
show myurl with dissolve:
xalign 0.5
yalign 0.7
$ renpy.pause()
return
The most important timing thing is to automatically advance text without clicking. The combination of {w=number} and {nw} does that quite nicely.
The second weird thing is how to handle choice menus. Because there’s otherwise no good way to handle that, and you really don’t want the timing to be at the whim of you clicking at the right time, I cheated…
I put up a real choice menu, then took screenshots of the screen and with the mouse hovered over each option, in turn. I then removed the choice menu and showed these screenshots instead (with a fake cursor image hovering over them and moving around).
Everything else is fairly straightforward. We rely heavily on RenPy automatically creating displayable for items in the /images folder with the right names. Everything else is just making sure we synchronize to the music.
To actually record the trailer, we take advantage of Windows 10′s game bar. Hit Win+G while the game is started, then start recording. The extra click and pause at the beginning is so you can move your cursor out of the way before the actual trailer starts. After it’s recorded, you can trim it to size using Windows 10′s Photos program (right click the video, Open With, Photos).
Part of the GUI work I did for Xenopathy was converting traditional buttons (in the quick menu, game menus, and confirmation screen, for example) into images, with hover tooltips that provide an explanation.
This is fairly straightforward to do in the quick menu/game menu case, where the location of the tooltip is fixed. You can even apply AT effects to the tooltip to make it fade out or whatever. I believe this is also the more “traditional” way of doing tooltips.
First thing’s first: We’ll need to define a screen to hold the tooltip text and a transform to show and hide it. In this case, the tooltip fades in as it moves leftward out of the buttons, and fades out as it moves rightward back into the buttons.
screen mm_tooltip(ttcontent):
     zorder 9999
     text ttcontent:
         xanchor 1.0 yanchor 1.0 ypos 1035 xsize 300 ysize 100
         at mm_tooltip_show
         font gui.name_text_font
 transform mm_tooltip_show(delaytimer=0.0, duration=0.25):
     alpha 0.0
     xpos 1305
     parallel:
         linear duration alpha 0.5
     parallel:
         linear duration xpos 1265
     on hide:
         parallel:
             linear duration alpha 0.0
         parallel:
             linear duration xpos 1305
Next are the actual menu items themselves. You can lay them out however you want, but the important part is the “Show” action for their hover attributes. (I’ve also added ATL effects, not shown above, to the buttons themselves so they fade in and out, in addition to the tooltip text.)
screen game_navigation():
     hbox:
         style_prefix "navigation"
         xanchor 1.0
         xpos 1800
         yanchor 1.0
         ypos 1045
         spacing 4
         imagebutton auto "gui/menu/return_%s.png":
             hovered Show("mm_tooltip",ttcontent="Return")
             unhovered Hide("mm_tooltip")
             action [Hide("mm_tooltip"), Return()]
             at qm_at
         imagebutton auto "gui/menu/main_%s.png":
             hovered Show("mm_tooltip",ttcontent="Main Menu")
             unhovered Hide("mm_tooltip")
             action [Hide("mm_tooltip"), MainMenu()]
             at qm_at
         imagebutton auto "gui/menu/history_%s.png":
             hovered Show("mm_tooltip",ttcontent="History")
             unhovered Hide("mm_tooltip")
             action [Hide("mm_tooltip"), ShowMenu("history")]
             at qm_at
         imagebutton auto "gui/menu/save_%s.png":
             hovered Show("mm_tooltip",ttcontent="Save")
             unhovered Hide("mm_tooltip")
             action [Hide("mm_tooltip"), ShowMenu('save')]
             at qm_at
         imagebutton auto "gui/menu/load_%s.png":
             hovered Show("mm_tooltip",ttcontent="Load")
             unhovered Hide("mm_tooltip")
             action [Hide("mm_tooltip"), ShowMenu('load')]
             at qm_at
         imagebutton auto "gui/menu/about_%s.png":
             hovered Show("mm_tooltip",ttcontent="About")
             unhovered Hide("mm_tooltip")
             action [Hide("mm_tooltip"), ShowMenu("about")]
             at qm_at
         imagebutton auto "gui/menu/prefs_%s.png":
             hovered Show("mm_tooltip",ttcontent="Preferences")
             unhovered Hide("mm_tooltip")
             action [Hide("mm_tooltip"), ShowMenu('preferences')]
             at qm_at
         imagebutton auto "gui/menu/quit_%s.png":
             hovered Show("mm_tooltip",ttcontent="Quit")
             unhovered Hide("mm_tooltip")
             action [Hide("mm_tooltip"), Quit(confirm=not main_menu)]
             at qm_at
So this is all well and good… but notice that we’ve had to hardcode the position of everything above. In particular, the location of the tooltip screen’s text was hardcoded to be placed next to the menu buttons.
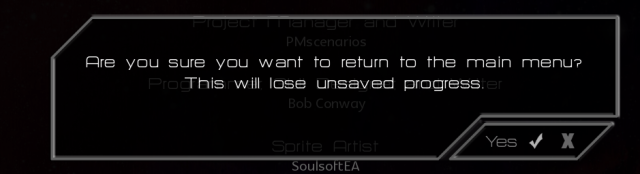
What happens now when we’re dealing with a modal screen (like the confirmation dialogue) that isn’t always located at a consistent place on the screen? We can’t exactly place the text at a certain x/y coordinate and expect it to look right all the time.
I tried a few different things for this… the most naive approach was to copy the above approach, and use the “use confirm_tooltip” to include the screen next to the buttons. While this does indeed show the screen, it also strangely results in the screen being shown twice: Once next to the buttons as expected, but again in the top left corner of the screen on hover.
Instead, I kind of hacked around the problem, using simple text elements that are rendered (or not) based on the state, and attaching ATL effects to them. This is definitely not ideal, but it does work.
In this case, we only have one screen (the confirmation dialogue itself) and attach transforms directly to text elements within it.
screen confirm(message, yes_action, no_action):
     modal True
     zorder 200
     style_prefix "confirm"
     add "gui/overlay/confirm.png"
     default tt_val = ""
     default tt_last = ""
     frame:
         vbox:
             xalign .5
             yalign .5
             spacing 20
             label message:
                 style "confirm_prompt"
                 xalign 0.5
                 text_font gui.name_text_font
             null height 25
             hbox:
                 spacing 4
                 yalign 1.0
                 xalign 1.0
                 if tt_val != "":
                     text tt_val:
                         yalign 0.5
                         font gui.name_text_font
                         at confirm_tooltip_show
                 else:
                     text tt_last:
                         yalign 0.5
                         font gui.name_text_font
                         at confirm_tooltip_hide
                 imagebutton auto "gui/menu/confirm_%s.png":
                     hovered [SetScreenVariable("tt_val", "Yes"),SetScreenVariable("tt_last", "Yes")]
                     unhovered SetScreenVariable("tt_val", "")
                     action yes_action
                     at qm_at
                 imagebutton auto "gui/menu/cancel_%s.png":
                     hovered [SetScreenVariable("tt_val", "No"),SetScreenVariable("tt_last", "No")]
                     unhovered SetScreenVariable("tt_val", "")
                     action no_action
                     at qm_at
     key "game_menu" action no_action
 transform confirm_tooltip_hide():
     alpha 0.5
     xoffset 0
     parallel:
         linear .25 alpha 0.0
     parallel:
         linear .25 xoffset 50
 transform confirm_tooltip_show():
     alpha 0.0
     xoffset 50
     parallel:
         linear .25 alpha 0.5
     parallel:
         linear .25 xoffset 0
And… voila! I first attempted to do this with a single tt_val text element, and an “on hide” directive in the transform, but it didn’t work, for some reason. The second tt_last text element is a hacky workaround, but it does do the trick.
I’ve been having a few discussions with people lately about custom RenPy commands, and generally recommending them because you get the ability to lint your game scripts.
For example, the fact that I have lint checks on my commands to show sprites, and change their expressions, helped me catch a bunch of typos and misordered arguments during sprite staging, which would have been a huge pain to track down later (and that would have resulted in exceptions during gameplay).
Given the benefits of lint, I wanted to share an extremely small example for something that I could have easily done manually: Changing characters’ facial hair in the game.
First off, the code:
python early:
     def parse_showstubble(lex):
         who = lex.simple_expression()
         level = lex.rest()
         return (who, level)
     def lint_showstubble(o):
         who, level = o
         if len(o) != 2 or who is None or level is None:
             renpy.error("Invalid showstubble declaration")
             return
         if who != "adam" and who != "james":
             renpy.error("Invalid person " + who)
             return
         try:
             lvlint = int(level)
             if lvlint < 0 or lvlint > 3:
                 renpy.error("Invalid level " + level)
         except ValueError:
             renpy.error("Invalid level " + level)
     def execute_showstubble(o):
         who, level = o
         if not who in store.spposes_data:
             store.spposes_data[who] = CharPoses()
         lvlint = int(level)
         if lvlint == 1:
             store.spposes_data[who].stubble = "_sblight"
         elif lvlint == 2:
             store.spposes_data[who].stubble = "_sbheavy"
         elif lvlint == 3:
             store.spposes_data[who].stubble = "_sbbeard"
         else:
             store.spposes_data[who].stubble = ""
     renpy.register_statement("showstubble", parse=parse_showstubble, execute=execute_showstubble, lint=lint_showstubble)
This then gets used in game code like
showstubble adam 1
It’s worth noting I could have easily not added this command, and simply written
$ sposes_data['adam'].stubble = "_sblight"
However. the benefit of doing it this way, again, is the lint checks. If you accidentally try to set stubble on someone else (say, Jake), or if you fat-finger the stubble value (23), you’ll get a pre-runtime error. Versus if you do that directly (say, “sblightr”), you’ll get an ugly runtime error only when you hit that line of code.
I’d argue there’s very little that isn’t worth making a custom command for. In addition to this, I have them for Instant Messaging in addition to Sprites and even the day transition code. In addition to linting, this gives you the ability to easily change something en masse (like when I wanted a day transition to also update the save identifier string).
Another thing I added for Whale’s Waldo is transition screens. Basically, whenever you first arrive in a new location, we show the name of the location with an image of the city before dumping you into narration/dialogue.
This was my first real introduction to ATL within screen language, and it’s actually straightforward to understand.
First, we define two transforms and a style for the text:
The first of the transforms will be used for a background behind the text, so that the text shows up nicely against any background. This simply fades in the image over 0.5 seconds, shows it for 2.3 seconds, and then fades it out again over 0.5 seconds.
The second of the transforms is for the text, so it scrolls in from the right, shows for a few seconds, and then drops down the screen as it fades out. You can follow the AT directives pretty straightforwardly, except note that any parallel lines will execute together. So, in this case, we linearly move it left and fade it in over 0.5 seconds, pause 2 seconds, and the linearly move it down and fade it out over 0.5 seconds.
Next, we define the screen that will actually be showing the information:
screen location_info(locname):
     fixed:
         at gui_fade_inout
         fixed:
             xpos 0.0
             xanchor 0.0
             ypos 0.5
             yanchor 0.5
             at gui_locdecor_background
             add "gui/place_background.png"
         frame:
             xsize 1200
             at gui_locdecor_bottom
             text locname:
                 style "gui_overlay_loc"
     timer 3.5 action Hide("location_info")
Nothing too complicated here. place_background.png is just a semi-transparent strip that matches the rest of our GUI. Note, though, the at directives applied to each, which reference the transforms we’d defined above. Also note that the screen will hide itself 3.5 seconds after we first show it.
Finally, all we have to do is actually use the screen in the game:
scene bodo_background with dissolve
show screen location_info("Bodo, North Norway, Norway")
$ renpy.pause(3.5)
hide screen location_info
scene first_bodo_location with dissolve
"Here we are in Bodo."
The only interesting here is the explicit hide screen location_info. This is technically optional, but without it, the only way for to hide the location name is by waiting for the 3.5 second timer. This means that if the player manually clicks through the screen, or is using the skip functionality, the screen will bleed over into the dialogue, because screens are not automatically hidden on scene changes. Explicitly hiding it takes care of these cases.
And… that’s it! A super simple example, but I think it actually turned out looking quite nice.
One of the things I had to figure out for Whale’s Waldo was how to animate a plane flight from one location to another. With RenPy’s powerful ATL language, this is surprisingly easy, and you can even draw the actual line without having to make a new image each time!
First thing’s first: Let’s define the RenPy displayable that will represent the actual flight line. You can do this by creating a custom Displayable class:
Now that you have the class, you can reuse and define instances of it for each trip you need to make. So let’s define the images for our flight from, say, New York City in the US to Bodo in Norway.
First, we need images for our plane, and a background image that is a map. Then we find the pixel coordinates on the map where we want to start and end our flight. Let’s say it’s (89,720) to (1739,150).
Now, we have all the components we need. As part of your RenPy script, simply show the necessary components with appropriate ATL transforms.
scene ny_background with dissolve
"Ready for our flight?"
scene map1 with dissolve
show flightoverlay1:
    xpos 0 ypos 0
    crop (0,0,88,1080)
    linear 5.0 crop (0,0,1740,1080)
show plane:
    xpos 89 ypos 720 xanchor 0.5 yanchor 0.5
    linear 5.0 xpos 1739 ypos 150
$ renpy.pause(6.0)
scene bodo_background with dissolve
"Now we’re here in Bodo."
The interesting part here is the “linear” commands, which tell RenPy to animate, linearly, from the existing set of display criteria to the new set. We crop the display representing the flight path, starting with none of it and then showing all of it, and we move the plane from one location to another in a straight line.
And… voila!
This can easily be reused for other flights by defining new map and flghtoverlay images.
If you’re not a fan of red lines, you can easily change the line color within your defined Displayable, or even make the color one of the arguments to the class.
Also worth noting that the Canvas object is capable of drawing more complicated shapes as well, so if you have simple shapes and images, you might want to let RenPy draw them for you instead of making new images each time. Details can be found in the Canvas object’s documentation.
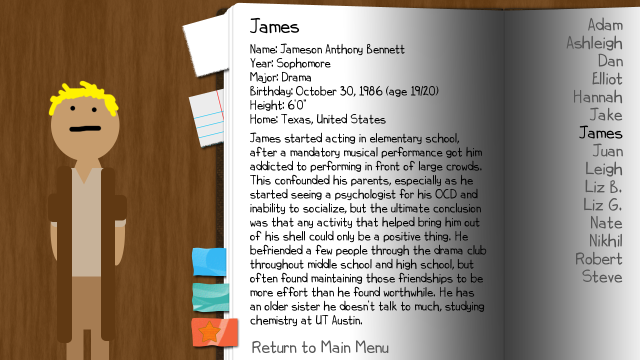
Another thing the game has (and will build on in the next release) is unlockable character profiles with some information about each character, in addition to some bonus features unlocked from them. As far as things I’ve posted here go, this is a fairly straightforward one, but I figured I’d share anyway.
First of all, I defined a block of data for each character’s information. In addition, because these are linked from the title screen via a sketched sprite, I included coordinates for the appropriate sprite.
python early:
     # list in reverse order of rendering on title screen
     real_profile_names = (
         "nick", "hannah", "elliot", "nate", "lizb", "lizg", "adam", "juan", "jake", "dan", "james",
     )
     profile_profile_info = {
         "adam": ("Adam", (950,340),
             "Sophomore", "Biology", "August 15, 1986 (age 20)", "6'2\"", "California, United States",
             "Adam James Prewitt",
             "Profile text for Adam"),
         "juan": ("Juan", (850,340),
             "Junior", "Biology", "April 22, 1986 (age 20)", "6'0\"", "Costa Rica",
             "Juan Rodrigo Salas Valverde",
             "Profile text for Juan"),
         …etc…
     }
Next we actually put these on the title screen.
screen main_menu():
     …Stuff…
     fixed:
         if "completed" in persistent.profiles:
             imagebutton auto "images/title/leigh_%s.png" action Show("char_profile", chname="ashleigh") xanchor 0.0 yanchor 0.0 pos (650, 140)
             imagebutton auto "images/title/leigh_%s.png" action Show("char_profile", chname="leigh") xanchor 0.0 yanchor 0.0 pos (850, 140)
             imagebutton auto "images/title/steve_%s.png" action Show("char_profile", chname="steve") xanchor 0.0 yanchor 0.0 pos (950, 140)
             imagebutton auto "images/title/robert_%s.png" action Show("char_profile", chname="robert") xanchor 0.0 yanchor 0.0 pos (1050, 140)
         for profname in real_profile_names:
             if profname in persistent.profiles:
                 imagebutton auto "images/title/" + profname + "_%s.png" action Show("char_profile", chname=profname) xanchor 0.0 yanchor 0.0 pos profile_profile_info[profname][1]
Next, we define the screen for character profiles. Note the additional features that I’ll get into shortly.
screen char_profile(chname):
     tag charprofile
     xpos 0
     ypos 0
     default pmode = "normal"
     fixed:
         add "images/sp/profilebg.png" xpos 0 ypos 0
         if pmode == "best":
             add "images/title/profile_" + chname + "best.png" xalign 0.5 yalign 1.0 xpos 175 ypos 720
         elif pmode == "good":
             add "images/title/profile_" + chname + "good.png" xalign 0.5 yalign 1.0 xpos 175 ypos 720
         else:
             add "images/title/profile_" + chname + ".png" xalign 0.5 yalign 1.0 xpos 175 ypos 720
         if (chname == "james" and persistent.permacc_james) or (…other guys’ checks…):
             add "images/title/profile_" + chname + "acc.png" xalign 0.5 yalign 1.0 xpos 175 ypos 720
         if chname + "best" in persistent.profiles or chname + "good" in persistent.profiles:
             imagebutton auto "images/sp/proftab_normal_%s.png" action SetScreenVariable("pmode", "normal") xanchor 0.0 yanchor 0.0 pos (375, 631)
             imagebutton auto "images/sp/proftab_good_%s.png" action SetScreenVariable("pmode", "good") xanchor 0.0 yanchor 0.0 pos (375, 559)
         if chname + "best" in persistent.profiles:
             imagebutton auto "images/sp/proftab_best_%s.png" action SetScreenVariable("pmode", "best") xanchor 0.0 yanchor 0.0 pos (375, 480)
             imagebutton auto "images/sp/profextra_%s.png" action Start("epilogue_bonus_" + chname + "1") xanchor 0.0 yanchor 0.0 pos (350, 0)
             imagebutton auto "images/sp/profpermacc_%s.png" action ToggleField(persistent, "permacc_" + chname) xanchor 0.0 yanchor 0.0 pos (363, 171)
         vbox xpos 500 ypos 30 xalign 0.0 xsize 480:
             spacing 10
             text "{size=40}" + profile_profile_info[chname][0] + "{/size}"
             text "{size=25}Name: " + profile_profile_info[chname][7] + "\nYear: " + profile_profile_info[chname][2] + "\nMajor: " + profile_profile_info[chname][3] + "\nBirthday: " + profile_profile_info[chname][4] + "\nHeight: " + profile_profile_info[chname][5] + "\nHome: " + profile_profile_info[chname][6] + "{/size}"
             text "{size=25}" + profile_profile_info[chname][8] + "{/size}"
         vbox xpos 1250 ypos 30 xalign 1.0 xsize 400:
             for k in sorted(profile_profile_info):
                 if k in persistent.profiles or ("completed" in persistent.profiles and k in ("ashleigh", "leigh", "steve", "robert")):
                     textbutton profile_profile_info[k][0] action [Show("char_profile", chname=k), SelectedIf(chname == k)] xalign 1.0
         textbutton "Return to Main Menu" action Hide("char_profile") xalign 0.0 xpos 500 ypos 675
As you can see, the profile screen has a few unlockable features. The first feature is buttons that let you view alternate poses for the character image, depending on which ending you’ve completed with the given person. This is implemented simply, with a screen variable indicating the mode.
The second feature is the ability to access a bonus scene for the given character, once you’ve found their HEA ending. Just define a label with the appropriate name (epilogue_bonus_james1 for example).
The last feature is a toggleable item on the guy that will persist on their sprite during subsequent playthroughs. For example, if you get James’ best ending, you can toggle his enagement ring on or off, and have it show up whenever he appears in the game. The associated code for that builds off of our sprite code and simply adds a new check for the persistent variable, and a layer.
And… that’s it. Obviously, your profiles don’t have to be nearly this complicated. If you just want to show some basic information for each character, the screen and associated logic will be much simpler.
Last time, we added a custom showsp command to easily show sprites that obey game settings automatically. But that can be tedious to use if all you want to do in a scene is change a character’s expression when they’re already onscreen. Cue showexp!
A couple of changes to the old code are necessary. First of all, we need to store the raw names for the clothing (you’ll see why in a moment).
Next, we define the parser and lint for showexp. Note that we’re allowing changes to the pose, as well, so this can be called as either showexp adam happy or showexp adam happy crossed.
python early:
     def parse_showexp(lex):
         who = lex.simple_expression()
         expr = lex.simple_expression()
         if lex.eol():
             return (who, None, expr)
         pose = lex.simple_expression()
         return (who, pose, expr)
     def lint_showexp(o):
         who, pose, expr = o
         if len(o) != 3 or expr is None:
             renpy.error("Invalid showsp declaration")
             return
         if not who in showsp_valid_combos:
             renpy.error("Invalid person " + who)
             return
         if pose is None:
             # don't know the pose so check across poses
             # may fail if a given expr only exists for one pose
             # but we can't track current pose state
             hasExpr = "e_" + expr in showsp_valid_combos[who]["!any"]
             if not hasExpr:
                 for pose in showsp_valid_combos[who]:
                     hasExpr = "e_" + expr in showsp_valid_combos[who][pose]
                     if hasExpr:
                         break
             if not hasExpr:
                 renpy.error("Invalid expression " + expr + " for " + who)
         else:
             if not pose in showsp_valid_combos[who]:
                 renpy.error("Invalid pose " + pose + " for " + who)
                 return
             if not "e_" + expr in showsp_valid_combos[who][pose] and not "e_" + expr in showsp_valid_combos[who]["!any"]:
                 renpy.error("Invalid expression " + expr + " for " + who + pose)
Note the documented limitation in linting. Since we don’t always have the pose information, if you have an expression that exists only for one pose, this will be missed by linting. (So make sure all expressions exist in some base form, and override them on a per-pose basis as necessary, to prevent this.)
Finally, the actual execute command, where we use the information we’d previously stored in the new fields:
    def execute_showexp(o):
         who, pose, expr = o
         if not who in store.spposes_data:
             renpy.error("Invalid person " + who)
         if pose is not None:
             if store.spposes_data[who].pose != pose:
                 # force all other components to re-render as necessary when pose changes
                 store.spposes_data[who].shirt = help_get_filepathsp(who, pose, "s", store.spposes_data[who].baseshirtstr)
                 store.spposes_data[who].pants = help_get_filepathsp(who, pose, "p", store.spposes_data[who].basepantsstr)
                 store.spposes_data[who].extras = help_get_filepathsp(who, pose, "x", store.spposes_data[who].baseextrasstr)
                 store.spposes_data[who].pose = pose
         else:
             pose = store.spposes_data[who].pose
         store.spposes_data[who].expression = help_get_filepathsp(who, pose, "e", expr)
     renpy.register_statement("showexp", parse=parse_showexp, execute=execute_showexp, lint=lint_showexp)
This will probably also fail if a particular shirt, pants, or extra exists only for one pose and you change pose as part of the command. Again, to be safe, make sure everything a character could be wearing exists at some form at the base level, or just don’t change poses around when using the command.
In any case, now you can more easily carry on a conversation without having to remember what a character was wearing in the same scene (or even where they’re standing, which is an improvement over the basic game’s show command, as well).
showsp adam sides greent jeans happy
adam "This is only a test. How do I look?"
showexp adam worried
adam "Does this look okay?"
showsp adam crossed bluet slacks curious jacket left
adam "Now I'm over here, and in blue. Huh."
showexp adam confused
adam "Strange."
showexp adam default crossed
adam "Oh well."
showexp adam grin sides
adam "It's nice to meet you anyway."
Yay! One last thing: Calling showexp before showsp will probably do nothing, since changing variables around while a sprite is offscreen has no effect. So if your script has a lot of jumps in it, you probably want to lead each label with a showsp for all of your characters, again, just to be safe.
One thing I needed was the ability to easily show sprites that obeyed various game settings automatically. For example, there’s a toggle in preferences to revert to the legacy stick figure sprites, there’s a nudity toggle, and there may eventually be an option to toggle body hair. In addition, the guys have a lot of different possible combinations of clothing and expressions.
There are a lot of “automatic” sprite scripts out there already, this oneprobably being one of the best ones. And for most people, I’m sure that will work just fine.
My requirements would have made that script tedious to use, though, since I would have had to case on different flags every time I wanted to show a sprite. Instead, I threw together a custom show command (showsp) that gives me the flexibility to change sprites depending on persistent and game state.
The first thing to do is to define the actual sprites. Since I’m supporting both the new style and old stick figures, each character has to be defined twice. Note the file structure requirements in the comment. It’s also worth noting that each expression must exist both in the old and new sprite directories.
default spposes_data = {}

 #file structure: base folder adam
 #under that, folders with name of poses (sides, crossed) with base.png under it
 #then either in base folder or in poses subfolder
 #s_.png, p_.png, e_.png, x_.png
 #in poses folder if differs by pose, base folder if not
 #x_blank.png and p_cover.png is required for all characters
 #s_shirtless, p_underwear, and p_naked are handled specially for legacy sprites, if they exist
 image adam adamnew = LiveComposite(
     (342, 600),
     (0, 0), "chnew/adam/[spposes_data[adam].pose]/base.png",
     (0, 0), "chnew/adam/[spposes_data[adam].pants].png",
     (0, 0), "chnew/adam/[spposes_data[adam].shirt].png",
     (0, 0), "chnew/adam/[spposes_data[adam].expression].png",
     (0, 0), "chnew/adam/[spposes_data[adam].extras].png",
     )
 #c_blank.png and c_basic.png are required for clothing in old sprites
 image adam adamold = LiveComposite(
     (500, 600),
     (0, 0), "chold/adam/base.png",
     (0, 0), "chold/adam/c_[spposes_data[adam].oldclothes].png",
     (0, 0), "chold/adam/[spposes_data[adam].expression].png",
     )
Also note we’re making use of dynamic images, which is particularly useful, and would work on its own, except you don’t get linting checks for invalid images, and it would make assignment within the game a bit of a pain.
Next, we actually define a command to show sprites. This is the heart of the framework, so I’ll go over it piece by piece.
First is the file processing. This automatically picks up all images from the chnew directory, sorts them by pose, and builds a map of all allowable assets.
python early:
     class CharPoses:
         pose = ""
         pants = ""
         shirt = ""
         expression = ""
         extras = ""
         oldclothes = ""
     showsp_valid_combos = {}
     showsp_valid_locations = ("left", "right", "slightleft", "moreright", "lessright")
     def process_file(charname, pose, filename):
         itemname = filename.replace(".png", "")
         if itemname != "base":
             if not pose in showsp_valid_combos[charname]:
                 showsp_valid_combos[charname][pose] = set()
             showsp_valid_combos[charname][pose].add(itemname)
     def process_all():
         for path in renpy.list_files():
             if path.startswith("images/chnew/"):
                 pathlist = path.split("/")
                 charname = pathlist[2]
                 if not charname in showsp_valid_combos:
                     showsp_valid_combos[charname] = {}
                     showsp_valid_combos[charname]["!any"] = set()
                 if pathlist[3].endswith(".png"):
                     process_file(charname, "!any", pathlist[3])
                 else:
                     process_file(charname, pathlist[3], pathlist[4])
     process_all()
Note the un-ideal manual declaration of supported Positions. This will show up again later, but I’m not sure how to take a position string and convert it to a Position object automatically.
Next, the custom command itself. The parsing logic is slightly complex, because we want to be able to omit the position and omit extras, in any combination. (Note that this technically means you can’t have both a Position and an extra with the same name, but you probably don’t want something like x_right.png anyway.)
Next, the linting. It’s technically unnecessary, but it’s invaluable unless you want to be tracking down runtime errors from invalid clothing or expressions in your game. Note the returns that prevent errors when you try to access a map item that doesn’t exist (due to invalid pose or character).
    def lint_showsp(o):
         who, pose, where, shirt, pants, expr, extras = o
         if where is not None and where not in showsp_valid_locations:
             renpy.error("Invalid location " + where)
         if not who in showsp_valid_combos:
             renpy.error("Invalid person " + who)
             return
         if not pose in showsp_valid_combos[who]:
             renpy.error("Invalid pose " + pose + " for " + who)
             return
         if not "s_" + shirt in showsp_valid_combos[who][pose] and not "s_" + shirt in showsp_valid_combos[who]["!any"]:
             renpy.error("Invalid shirt " + shirt + " for " + who + pose)
         if not "p_" + pants in showsp_valid_combos[who][pose] and not "p_" + pants in showsp_valid_combos[who]["!any"]:
             renpy.error("Invalid pants " + pants + " for " + who + pose)
         if not "e_" + expr in showsp_valid_combos[who][pose] and not "e_" + expr in showsp_valid_combos[who]["!any"]:
             renpy.error("Invalid expression " + expr + " for " + who + pose)
         if extras is not None and not "x_" + extras in showsp_valid_combos[who][pose] and not "x_" + extras in showsp_valid_combos[who]["!any"]:
             renpy.error("Invalid extra " + extras + " for " + who + pose)
Finally, the actual command logic:
    def help_get_filepathsp(who, pose, prefix, item):
         if prefix == "x" and item is None:
             return "x_blank"
         if prefix + "" + item in showsp_valid_combos[who][pose]:             return pose + "/" + prefix + "" + item
         elif prefix + "" + item in showsp_valid_combos[who]["!any"]:             return prefix + "" + item
         else:
             renpy.error("Could not find resource " + prefix + "_" + item + " for " + who + pose)
     def execute_showsp(o):
         who, pose, where, shirt, pants, expr, extras = o
         whereobj = None
         if where is not None:
             if where == "left":
                 whereobj = left
             elif where == "right":
                 whereobj = right
             elif where == "slightleft":
                 whereobj = slightleft
             elif where == "moreright":
                 whereobj = moreright
             elif where == "lessright":
                 whereobj = lessright
             else:
                 renpy.error("Unknown location " + where)
         else:
             whereobj = default
         # TODO: Special variable checks to override things here
         # possibly on a character-specific basis
         if pants == "naked" and not persistent.nudes:
             pants = "cover"
         # End special checks
         if not who in store.spposes_data:
             store.spposes_data[who] = CharPoses()
         store.spposes_data[who].pose = pose
         store.spposes_data[who].shirt = help_get_filepathsp(who, pose, "s", shirt)
         store.spposes_data[who].pants = help_get_filepathsp(who, pose, "p", pants)
         store.spposes_data[who].expression = help_get_filepathsp(who, pose, "e", expr)
         store.spposes_data[who].extras = help_get_filepathsp(who, pose, "x", extras)
         # handle old sprites; either they're dressed or they're not
         if pants == "naked" or pants == "underwear" or pants == "cover" or shirt == "shirtless":
             store.spposes_data[who].oldclothes = "blank"
         else:
             store.spposes_data[who].oldclothes = "basic"
         if persistent.oldsprites:
             renpy.show(who + " " + who + "old", at_list=[whereobj])
         else:
             renpy.show(who + " " + who + "new", at_list=[whereobj])
     renpy.register_statement("showsp", parse=parse_showsp, execute=execute_showsp, lint=lint_showsp)
A few things to note here: The position stuff is really non-ideal (you need to manually handle every position you support for sprites in the game), but you can’t just do at_list=[where] as where is a string and not a position. There’s special logic to handle overrides, such as putting a covering over the character if they’re naked and nudity is turned off; it would be straightforward to handle body hair the same way. You can also override special cases manually (for example, I’ll probably handle Juan’s cast this way by reading the current game state instead of having to put the cast as an extra every time).
This should also be easily extensible if you want to build expressions from pieces (eyebrows, eyes, mouth) by adding support for things like b_, y_, and m_.
In any case, all of this mess of code allows you to write your game script like this:
showsp adam sides greent jeans happy jacket left
adam "This is only a test. How do I look?"
showsp adam crossed bluet slacks curious right
adam "Now I'm over here"
showsp adam crossed shirtless jeans embarassed
adam "And losing my clothing."
showsp adam sides shirtless underwear embarassed jacket
adam "That's not really any better."
Which is really nice given it’s obeying all of your game state and preferences automatically.
Future enhancement: A showexp command that changes just the expression on the given sprite, without having to re-specify the rest of the clothing or position.
Edit: The showexp command has been defined here. Also, I found a way to grab the location object based on the string name for it.
        if where is not None:
             if where in showsp_valid_locations:
                 whereobj = globals()[where]
             else:
                 renpy.error("Unknown location " + where)
         else:
             whereobj = default
I kept the showsp_valid_locations list in place, because it seemed useful. (After all, you want to make sure what you’re grabbing is actually a Position object that you expect, and not some arbitrary RenPy object sitting there.) But this means adding a new position is just a matter of defining it and updating the list, instead of actually updating code.