One of the things I had to figure out for Whale’s Waldo was how to animate a plane flight from one location to another. With RenPy’s powerful ATL language, this is surprisingly easy, and you can even draw the actual line without having to make a new image each time!
First thing’s first: Let’s define the RenPy displayable that will represent the actual flight line. You can do this by creating a custom Displayable class:
init python:
     class FlightLine(renpy.Displayable):
         def __init__(self, startloc, stoploc, **kwargs):
             renpy.Displayable.init(self, **kwargs)
             self.startloc = startloc
             self.stoploc = stoploc
         def render(self, width, height, st, at):
             render = renpy.Render(1920,1080)
             canvas = render.canvas()
             canvas.line("#f00", self.startloc, self.stoploc, width=10)
             return render
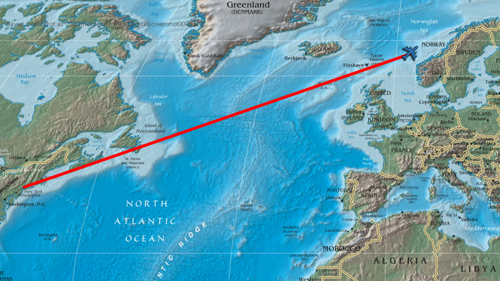
Now that you have the class, you can reuse and define instances of it for each trip you need to make. So let’s define the images for our flight from, say, New York City in the US to Bodo in Norway.
First, we need images for our plane, and a background image that is a map. Then we find the pixel coordinates on the map where we want to start and end our flight. Let’s say it’s (89,720) to (1739,150).
image plane = "plane.png"
image map1 = "map1.jpg"
image flightoverlay1 = FlightLine((89,720),(1739,150))
Now, we have all the components we need. As part of your RenPy script, simply show the necessary components with appropriate ATL transforms.
scene ny_background with dissolve
"Ready for our flight?"
scene map1 with dissolve
show flightoverlay1:
    xpos 0 ypos 0
    crop (0,0,88,1080)
    linear 5.0 crop (0,0,1740,1080)
show plane:
    xpos 89 ypos 720 xanchor 0.5 yanchor 0.5
    linear 5.0 xpos 1739 ypos 150
$ renpy.pause(6.0)
scene bodo_background with dissolve
"Now we’re here in Bodo."
The interesting part here is the “linear” commands, which tell RenPy to animate, linearly, from the existing set of display criteria to the new set. We crop the display representing the flight path, starting with none of it and then showing all of it, and we move the plane from one location to another in a straight line.
And… voila!
This can easily be reused for other flights by defining new map and flghtoverlay images.
If you’re not a fan of red lines, you can easily change the line color within your defined Displayable, or even make the color one of the arguments to the class.
Also worth noting that the Canvas object is capable of drawing more complicated shapes as well, so if you have simple shapes and images, you might want to let RenPy draw them for you instead of making new images each time. Details can be found in the Canvas object’s documentation.