Codes: Hover Tooltips, Two Ways

Part of the GUI work I did for Xenopathy was converting traditional buttons (in the quick menu, game menus, and confirmation screen, for example) into images, with hover tooltips that provide an explanation.

This is fairly straightforward to do in the quick menu/game menu case, where the location of the tooltip is fixed. You can even apply AT effects to the tooltip to make it fade out or whatever. I believe this is also the more “traditional” way of doing tooltips.

First thing’s first: We’ll need to define a screen to hold the tooltip text and a transform to show and hide it. In this case, the tooltip fades in as it moves leftward out of the buttons, and fades out as it moves rightward back into the buttons.

screen mm_tooltip(ttcontent):
zorder 9999
text ttcontent:
xanchor 1.0 yanchor 1.0 ypos 1035 xsize 300 ysize 100
at mm_tooltip_show
font gui.name_text_font
transform mm_tooltip_show(delaytimer=0.0, duration=0.25):
alpha 0.0
xpos 1305
parallel:
linear duration alpha 0.5
parallel:
linear duration xpos 1265
on hide:
parallel:
linear duration alpha 0.0
parallel:
linear duration xpos 1305

Next are the actual menu items themselves. You can lay them out however you want, but the important part is the “Show” action for their hover attributes. (I’ve also added ATL effects, not shown above, to the buttons themselves so they fade in and out, in addition to the tooltip text.)

screen game_navigation():
hbox:
style_prefix "navigation"
xanchor 1.0
xpos 1800
yanchor 1.0
ypos 1045
spacing 4
imagebutton auto "gui/menu/return_%s.png":
hovered Show("mm_tooltip",ttcontent="Return")
unhovered Hide("mm_tooltip")
action [Hide("mm_tooltip"), Return()]
at qm_at
imagebutton auto "gui/menu/main_%s.png":
hovered Show("mm_tooltip",ttcontent="Main Menu")
unhovered Hide("mm_tooltip")
action [Hide("mm_tooltip"), MainMenu()]
at qm_at
imagebutton auto "gui/menu/history_%s.png":
hovered Show("mm_tooltip",ttcontent="History")
unhovered Hide("mm_tooltip")
action [Hide("mm_tooltip"), ShowMenu("history")]
at qm_at
imagebutton auto "gui/menu/save_%s.png":
hovered Show("mm_tooltip",ttcontent="Save")
unhovered Hide("mm_tooltip")
action [Hide("mm_tooltip"), ShowMenu('save')]
at qm_at
imagebutton auto "gui/menu/load_%s.png":
hovered Show("mm_tooltip",ttcontent="Load")
unhovered Hide("mm_tooltip")
action [Hide("mm_tooltip"), ShowMenu('load')]
at qm_at
imagebutton auto "gui/menu/about_%s.png":
hovered Show("mm_tooltip",ttcontent="About")
unhovered Hide("mm_tooltip")
action [Hide("mm_tooltip"), ShowMenu("about")]
at qm_at
imagebutton auto "gui/menu/prefs_%s.png":
hovered Show("mm_tooltip",ttcontent="Preferences")
unhovered Hide("mm_tooltip")
action [Hide("mm_tooltip"), ShowMenu('preferences')]
at qm_at
imagebutton auto "gui/menu/quit_%s.png":
hovered Show("mm_tooltip",ttcontent="Quit")
unhovered Hide("mm_tooltip")
action [Hide("mm_tooltip"), Quit(confirm=not main_menu)]
at qm_at

So this is all well and good… but notice that we’ve had to hardcode the position of everything above. In particular, the location of the tooltip screen’s text was hardcoded to be placed next to the menu buttons.

What happens now when we’re dealing with a modal screen (like the confirmation dialogue) that isn’t always located at a consistent place on the screen? We can’t exactly place the text at a certain x/y coordinate and expect it to look right all the time.

image

I tried a few different things for this… the most naive approach was to copy the above approach, and use the “use confirm_tooltip” to include the screen next to the buttons. While this does indeed show the screen, it also strangely results in the screen being shown twice: Once next to the buttons as expected, but again in the top left corner of the screen on hover.

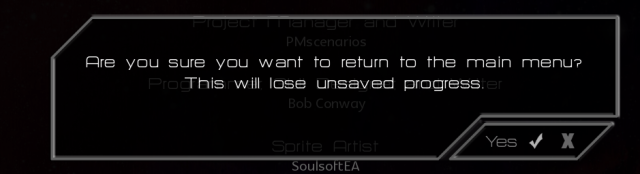
Instead, I kind of hacked around the problem, using simple text elements that are rendered (or not) based on the state, and attaching ATL effects to them. This is definitely not ideal, but it does work.

In this case, we only have one screen (the confirmation dialogue itself) and attach transforms directly to text elements within it.

screen confirm(message, yes_action, no_action):
modal True
zorder 200
style_prefix "confirm"
add "gui/overlay/confirm.png"
default tt_val = ""
default tt_last = ""
frame:
vbox:
xalign .5
yalign .5
spacing 20
label message:
style "confirm_prompt"
xalign 0.5
text_font gui.name_text_font
null height 25
hbox:
spacing 4
yalign 1.0
xalign 1.0
if tt_val != "":
text tt_val:
yalign 0.5
font gui.name_text_font
at confirm_tooltip_show
else:
text tt_last:
yalign 0.5
font gui.name_text_font
at confirm_tooltip_hide
imagebutton auto "gui/menu/confirm_%s.png":
hovered [SetScreenVariable("tt_val", "Yes"),SetScreenVariable("tt_last", "Yes")]
unhovered SetScreenVariable("tt_val", "")
action yes_action
at qm_at
imagebutton auto "gui/menu/cancel_%s.png":
hovered [SetScreenVariable("tt_val", "No"),SetScreenVariable("tt_last", "No")]
unhovered SetScreenVariable("tt_val", "")
action no_action
at qm_at
key "game_menu" action no_action
transform confirm_tooltip_hide():
alpha 0.5
xoffset 0
parallel:
linear .25 alpha 0.0
parallel:
linear .25 xoffset 50
transform confirm_tooltip_show():
alpha 0.0
xoffset 50
parallel:
linear .25 alpha 0.5
parallel:
linear .25 xoffset 0

And… voila! I first attempted to do this with a single tt_val text element, and an “on hide” directive in the transform, but it didn’t work, for some reason. The second tt_last text element is a hacky workaround, but it does do the trick.

Codes: Changing Stubble (lol)

I’ve been having a few discussions with people lately about custom RenPy commands, and generally recommending them because you get the ability to lint your game scripts.

For example, the fact that I have lint checks on my commands to show sprites, and change their expressions, helped me catch a bunch of typos and misordered arguments during sprite staging, which would have been a huge pain to track down later (and that would have resulted in exceptions during gameplay).

Given the benefits of lint, I wanted to share an extremely small example for something that I could have easily done manually: Changing characters’ facial hair in the game.

First off, the code:

python early:
def parse_showstubble(lex):
who = lex.simple_expression()
level = lex.rest()
return (who, level)
def lint_showstubble(o):
who, level = o
if len(o) != 2 or who is None or level is None:
renpy.error("Invalid showstubble declaration")
return
if who != "adam" and who != "james":
renpy.error("Invalid person " + who)
return
try:
lvlint = int(level)
if lvlint < 0 or lvlint > 3:
renpy.error("Invalid level " + level)
except ValueError:
renpy.error("Invalid level " + level)
def execute_showstubble(o):
who, level = o
if not who in store.spposes_data:
store.spposes_data[who] = CharPoses()
lvlint = int(level)
if lvlint == 1:
store.spposes_data[who].stubble = "_sblight"
elif lvlint == 2:
store.spposes_data[who].stubble = "_sbheavy"
elif lvlint == 3:
store.spposes_data[who].stubble = "_sbbeard"
else:
store.spposes_data[who].stubble = ""
renpy.register_statement("showstubble", parse=parse_showstubble, execute=execute_showstubble, lint=lint_showstubble)

This then gets used in game code like

showstubble adam 1

It’s worth noting I could have easily not added this command, and simply written

$ sposes_data['adam'].stubble = "_sblight"

However. the benefit of doing it this way, again, is the lint checks. If you accidentally try to set stubble on someone else (say, Jake), or if you fat-finger the stubble value (23), you’ll get a pre-runtime error. Versus if you do that directly (say, “sblightr”), you’ll get an ugly runtime error only when you hit that line of code.

I’d argue there’s very little that isn’t worth making a custom command for. In addition to this, I have them for Instant Messaging in addition to Sprites and even the day transition code. In addition to linting, this gives you the ability to easily change something en masse (like when I wanted a day transition to also update the save identifier string).

Codes: Location Transition Screen with ATL

Another thing I added for Whale’s Waldo is transition screens. Basically, whenever you first arrive in a new location, we show the name of the location with an image of the city before dumping you into narration/dialogue.

This was my first real introduction to ATL within screen language, and it’s actually straightforward to understand.

First, we define two transforms and a style for the text:

transform gui_locdecor_background:
alpha 0.0
pause 0.2
linear 0.5 alpha 1.0
pause 2.3
linear 0.5 alpha 0.0
transform gui_locdecor_bottom:
alpha 0.0
xalign 0.5 ypos 967
xoffset 200 yoffset -400
pause 0.4
parallel:
linear 0.5 alpha 1.0
parallel:
easein 0.5 xoffset 0
pause 2.0
parallel:
linear 0.5 alpha 0.0
parallel:
easein 0.5 yoffset 0
style gui_overlay_loc:
font gui.advname_font_face
size gui.advname_font_size * 0.8
color Color(color=gui.advname_font_color,alpha=0.75)
kerning gui.advname_font_kerning * 1.3 text_align 0.5
xalign 0.5
yoffset -15

The first of the transforms will be used for a background behind the text, so that the text shows up nicely against any background. This simply fades in the image over 0.5 seconds, shows it for 2.3 seconds, and then fades it out again over 0.5 seconds.

The second of the transforms is for the text, so it scrolls in from the right, shows for a few seconds, and then drops down the screen as it fades out. You can follow the AT directives pretty straightforwardly, except note that any parallel lines will execute together. So, in this case, we linearly move it left and fade it in over 0.5 seconds, pause 2 seconds, and the linearly move it down and fade it out over 0.5 seconds.

Next, we define the screen that will actually be showing the information:

screen location_info(locname):
fixed:
at gui_fade_inout
fixed:
xpos 0.0
xanchor 0.0
ypos 0.5
yanchor 0.5
at gui_locdecor_background
add "gui/place_background.png"
frame:
xsize 1200
at gui_locdecor_bottom
text locname:
style "gui_overlay_loc"
timer 3.5 action Hide("location_info")

Nothing too complicated here. place_background.png is just a semi-transparent strip that matches the rest of our GUI. Note, though, the at directives applied to each, which reference the transforms we’d defined above. Also note that the screen will hide itself 3.5 seconds after we first show it.

Finally, all we have to do is actually use the screen in the game:

scene bodo_background with dissolve
show screen location_info("Bodo, North Norway, Norway")
$ renpy.pause(3.5)
hide screen location_info
scene first_bodo_location with dissolve
"Here we are in Bodo."

The only interesting here is the explicit hide screen location_info. This is technically optional, but without it, the only way for to hide the location name is by waiting for the 3.5 second timer. This means that if the player manually clicks through the screen, or is using the skip functionality, the screen will bleed over into the dialogue, because screens are not automatically hidden on scene changes. Explicitly hiding it takes care of these cases.

And… that’s it! A super simple example, but I think it actually turned out looking quite nice.

Codes: Drawing a Flight Path

One of the things I had to figure out for Whale’s Waldo was how to animate a plane flight from one location to another. With RenPy’s powerful ATL language, this is surprisingly easy, and you can even draw the actual line without having to make a new image each time!

First thing’s first: Let’s define the RenPy displayable that will represent the actual flight line. You can do this by creating a custom Displayable class:

init python:
class FlightLine(renpy.Displayable):
def __init__(self, startloc, stoploc, **kwargs):
renpy.Displayable.init(self, **kwargs)
self.startloc = startloc
self.stoploc = stoploc
def render(self, width, height, st, at):
render = renpy.Render(1920,1080)
canvas = render.canvas()
canvas.line("#f00", self.startloc, self.stoploc, width=10)
return render

Now that you have the class, you can reuse and define instances of it for each trip you need to make. So let’s define the images for our flight from, say, New York City in the US to Bodo in Norway.

First, we need images for our plane, and a background image that is a map. Then we find the pixel coordinates on the map where we want to start and end our flight. Let’s say it’s (89,720) to (1739,150).

image plane = "plane.png"
image map1 = "map1.jpg"
image flightoverlay1 = FlightLine((89,720),(1739,150))

Now, we have all the components we need. As part of your RenPy script, simply show the necessary components with appropriate ATL transforms.

scene ny_background with dissolve
"Ready for our flight?"
scene map1 with dissolve
show flightoverlay1:
xpos 0 ypos 0
crop (0,0,88,1080)
linear 5.0 crop (0,0,1740,1080)
show plane:
xpos 89 ypos 720 xanchor 0.5 yanchor 0.5
linear 5.0 xpos 1739 ypos 150
$ renpy.pause(6.0)
scene bodo_background with dissolve
"Now we’re here in Bodo."

The interesting part here is the “linear” commands, which tell RenPy to animate, linearly, from the existing set of display criteria to the new set. We crop the display representing the flight path, starting with none of it and then showing all of it, and we move the plane from one location to another in a straight line.

And… voila!

This can easily be reused for other flights by defining new map and flghtoverlay images.

If you’re not a fan of red lines, you can easily change the line color within your defined Displayable, or even make the color one of the arguments to the class.

Also worth noting that the Canvas object is capable of drawing more complicated shapes as well, so if you have simple shapes and images, you might want to let RenPy draw them for you instead of making new images each time. Details can be found in the Canvas object’s documentation.

Adam CG

Realizing I never shared this WIP. Enjoy the Adam.

I explored the idea of CGs in YAGS briefly, but ultimately decided it didn’t make financial sense. But the first (and, now, only) one that I commissioned, as a test, is making good progress!

I think this is going to become the cover for the Behind-the-Scenes book instead (and maybe also a desktop wallpaper), so at least it won’t go to waste.

Jake inks, more tentacle sprites

Here’s some inks for Jake, via the talented @stollcomics. Looking forward to his final version!

Given my incredible success at making my own Juan sprite, I went through and also did sprites for the other characters, and replaced them in the game. It looks pretty, uh… special.

I’m hoping to have sprites for everyone replaced by this weekend, which means it’ll be a significantly simpler matter of dropping in the final sprites when I get them.

Dan reposed sketch, and status

I’d gotten some feedback that Dan’s previous pose was a little strange. It was intended to be a friendly “I want a hug” kind of pose, but ended up not quite looking like that, and also looked particularly odd when I started to replace his sprite in the game, because he didn’t have a more generic default pose.

@stollcomics was awesome enough to oblige me, and came up with this instead, which I think fits his character well and also is a much more reasonable “default” for him.

I also wanted to provide a general status update, because it’s been an incredibly productive winter break. I’ve actually gotten through the entirety of my last TODO list except for updates based on personality. But more importantly, I’ve also finished spite replacement in the game for Dan, Jake, and Juan, which means the next game build is ready to go once those sprites are in.

This was particularly interesting for Juan, because I don’t have even a sketch version for him yet, so I improvised by making a variant stick figure sprite that included his different clothing. The result was rather, uh… interesting.

The behind-the-scenes book is also making good progress. In particular, I finished the guides on how to obtain all of the achievements and collectibles, wrote the sections on the different locations in the game, and mostly finished the section on characters.

Hopefully this productivity will continue.

Also, a very happy new year to everyone!